
In order to add new code to an existing code repository, NSWERS uses the following process to update our code projects.
The examples below are given based on the git command line interface. Many additional options are available: https://git-scm.com/cheat-sheet. Many integrated development environments (IDE) have their own interface to accomplish these actions.
Primary repository: https://dev.azure.com/NSWERS/
- If the code does NOT yet existing on your local machine, begin by cloning it from our DevOps environment to a local folder.
- Using
gitgit clone <repository url>
- Using
- If the code DOES exist, it needs to be updated first.
- NOTICE: any local changes need to be committed.
- Using
git. Run in sequence:git fetchgit pull --rebase origin <name of staging branch: staging, develop, etc>
- Create a new branch for this issue/feature.
- Before creating a new branch, always switch to the staging branch first and ensure it is up to date (see step #2). This ensures your new branch starts clean and does not carry over commits from a previous branch.
- NAMING STANDARDS: This should be your initials followed by some sort of short identifier. If this branch is isolated to a single issue, you can use the DevOps work item ID (see below).
<initials>.<DevOps ID or description>- For example:
dgh.certificationfeaturedgh.4390
- Using
git:git checkout -b<new branch name>
- Make all necessary code changes.
- Recommend making commits and pushing the branch to DevOps REGULARLY (end of each day minimum) in order to protect work. Commits would, ideally, be made any time a specific feature/method is complete.
- The branch should be regularly updated from the staging branch in order to catch any merge conflicts early (see step #2).
- Please make the commit message be descriptive enough to understand what changes were made.
- Using
git:git add .(adds all changed files)git add <file name>(use this instead if only specific files should be committed)git commit -m 'message'git pull origin <name of staging branch: staging, develop, etc>(pull latest changes from staging before pushing to catch any merge conflicts early)- First push:
git push -u origin <branch name> - Subsequent pushes:
git push
- Once all changes are complete and pushed, they need to be merged from your development branch into the staging branch. This uses a Pull Request. Once the pull request is complete, the development branch will be deleted.
- Navigate to the project page in DevOps. Some tools (i.e. Visual Studio) will provide a link when you push your changes to create the pull request.
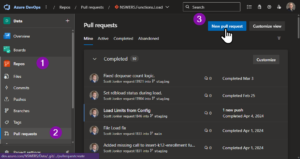
- Click on Repos (1) and then click on Pull Requests (2)
- Click on New Pull Request (3)
- Fill in the pull request form
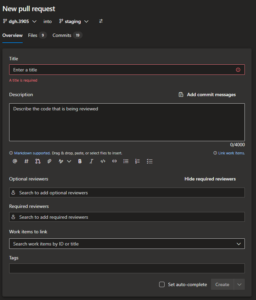
- Select your feature branch as the source and the staging branch as the target.
- Review the commits and changes to files (Files and Commits tabs).
- TITLE: A descriptive title for this change (REQUIRED)
- DESCRIPTION: A thorough descripting of the change, including any additional configuration changes or other relevant notes. This is to provide context for the reviewer, as well as notes to “future” selves if we need to trouble shoot later. (REQUIRED)
- OPTIONAL REVIEWERS: Others that may need to see this PR
- REQURED REVIEWERS: Each PR should have 1 required reviewer. This may vary, but can always be defaulted to your supervisor who can change if necessary. (REQUIRED)
- WORK ITEMS TO LINK: This is required for every PR. The ID(s) can be found by viewing the Teamhood card. Teamhood cards are automatically synchronized with DevOps and the DevOps work item id is noted within the card.
NOTE: It may take a few minutes for the synchronization to happen. If the DevOpsID field is blank, either wait for some time, or it can be forced if urgent (ask David H. to do this). (REQUIRED)
- Click on Create to finish creating the Pull Request.
- The pull request will trigger any pull request pipelines, and the reviewers notified that a PR is ready for review. In the event there are any pipeline issues, they will need to be remediated and new changes pushed into the same branch. This will re-trigger the pipelines, and a new PR DOES NOT need to be created.
Leave a Reply